
Reposting because the original one archived:
Hello everyone. As of late I have heard many people want a simpler version of the guide regarding our File Policy. I made one back in December, however I think it'd be best to make an updated version of it ^^.
Let's start with uploading this piece of fan art:

「art by osreido」
What are the categories?[]

Don't worry, categories are actually more simple than you think! Here's a basic run-down:
- User files -- This category is specifically for files that are not on articles or in galleries such as fan art, edits, memes, etc. More often than not, you will be using this category for your files.
- Gallery files -- This category is specifically for files that are placed in article pages or galleries. You can refer to currently existing galleries and articles for a reference.
Adding categories[]
Now that you know what is what, it's time to actually apply this to your recently uploaded file! I am aware that some people have issues with the button so I will be presenting three different ways to add the category. Since we're uploading a fan art, we will be using "User files".
Option #1 -- the Classic Way[]
The first option is to simply use the "Add Category" button found on the file's page.

If you go onto the file's page you can see the button at the very bottom of it. Once you find it, click on it!


This should pop up once you do so.


Now that you have it open, you simply just type the category you need to add.


Once you do that, you can either press your keyboard's "Enter" button to confirm the category after you type it out OR you can press the drop-down with the category name. Remember to press "Save"! If you don't then the category will not be added!


Andddddddddd now you're done!
Option #2 -- the Edit Button[]
The second option is to go onto the file page and press the "Edit" button found on the top above the image. Also ignore my extra buttons, those are just tools I have as an admin and aren't important for doing this.


Once you click the buttons, you'll be directed to this page.

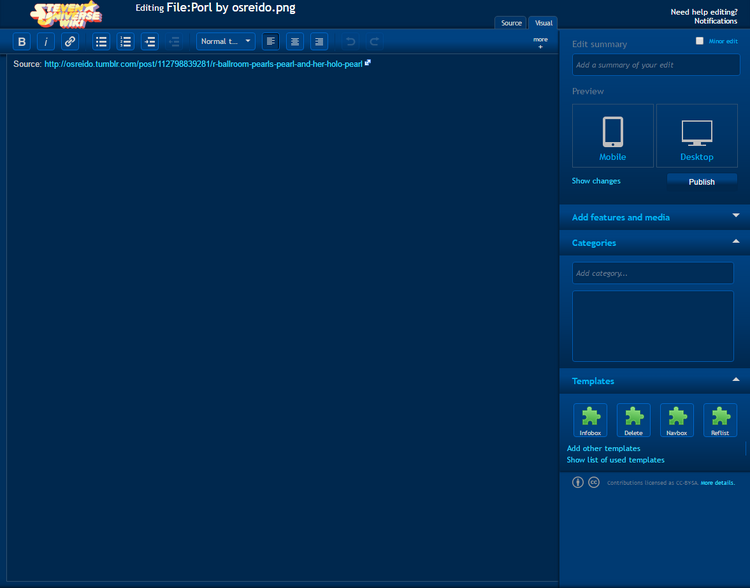
If you look onto the right sidebar, you'll see a box that says "Categories". You basically just do the same thing as in Option #1 and then press the "Publish" button like you would do with any other edit.


Option #3 -- the Description[]
This one is pretty easy and straight-forward. When you upload your image, you can just put [[Category:User files]] into the description and it'll be added for you. Simple as that!


Using the image[]
Now that you categorized your image, you need to use it somewhere on the wiki. You have to remember that we are not an image-hosting site, so if something is unused, we will delete it. If you decide not to use an image, please tell one of the admins or patrollers to delete it for you!
I hope this helped you out. Leave a comment if you have any questions. Thanks for reading!